So what is the colour of insanity, well I did my research and it's orange so nobody can call me on this one. Sorry, I think I may still be a little loopy from painting that studio. As per my previous post I antagonized endlessly over colour (mostly because like hell I'm going paint it again). I went with my instinct which does pay off now and then.
This green is the coolest colour I've ever seen, but I was still apprehensive about splashing it up on the walls that I plan to be surrounded by for most of my coming days. I mean I like ginger too, but that doesn't mean I should put it in my coffee.
The front porch or 'nook' as I like to call it so Jeremy and I stop getting confused about which porch we are talking about, got the 'Seafoam' treatment. Where in approximately one third of the main area received the controversial but aptly named 'Jaunty'
I'll let the photos speak for themselves.
I painted the bedroom/office a generic kind of grey colour and the bathroom is a light lemony colour. Jeremy hopped on board and installed the light fixtures once the ceilings were done.
Whew, what an ungodly job. The building is so small so it felt like I was spinning in circles dripping paint the whole time. I'm insanely pleased with the results so far. Although there is an awfully long way to go, I can't help but feel as though the worst is behind us.
We caught a sale and bought the flooring for the studio last week and we were expecting to have the laminate in our ready and willing hands but unfortunately the materials will not be available to us until the end of May. I am disappointed but glad for a short reprieve where perhaps we can tackle some of the more mundane of the Spring chores... or even just pick up some of the beer cans... So I tidied up the lawn of the studio as to keep the town inspectors off our backs (and subdue the neighborhood grumblings). At the same time we have also emptied out the shop of all our boxes, some of which have not been opened for 9 years. So my clean-up efforts at the studio are basically made void. Soon the 'treasures' that we have been toting around for who knows what reason will be up for sale at the community garage sale in the coming weeks.
The main focus of the renovation hell that is our lives has been on the studio but to a lesser degree Jeremy has been insulating his shop and building (in my opinion) fancy counters, work benches, cupboards and shelves. He has done an exceptional job (keeping the cost hidden from me in the process). The building process in his shop is basically complete, and pretty much relevant to our success when we start the big one in July.
My last little blurb pertains to the discovery of this old trunk in the garden shed. It's pretty beat up and unfortunately loot free. But it's still an interesting piece. I'm going to hang onto it for a while and see if I ever get around to restoring it.
Well I believe I will open this blog post as most Canadian blog posts have been opened for the past month... Can you believe this Spring? I haven't updated the blog in a month mostly due to some spring blues.
Anyhow the snow is mostly gone and the weather is looking warmer (finally). I have been working my tail off trying to force my way through the onerous steps of mudding drywall. It's been a learning curve but I'm more than capable of mudding/taping/sanding the next building.... Although the thought makes me want to cut off my hands. It's done. I will never have to work on drywall in this studio ever again!
Today Jeremy and I started the priming. He's all back on board... I could go into a wifely tale of abandonment and how a woman is the center of the universe, but Jeremy did work on the studio with no insulation or heat all winter... So I'll hold my tongue. We had to rent some scaffold to reach the vaulted ceiling in the main room. While we had the scaffold we (I) decided to get all the tapping/mudding/sanding/repeat/primer/paint and finally the fan hung. Jeremy put the fan up. Priming was fun (sarcasm). Jeremy and I had an on going conversation.
A: "This looks good, do you think it really needs a second coat of primer?"
B: "Well, we should do it right the first time"
Basically every 20 minutes or so we would have this conversation, switching back and forth being Mike Homes.
All drywall aside, it's time to pick out colours! *smack self in head* I really don't like this part. Every time I figure it's going to be awesome to get the colours picked out... but then it snowballs into a second guessing, back and fourth nightmare. Honestly I know exactly what I want, kind of. I need a creative, down to earth, soothing, inspiring, energetic, grown-up, playful, comfortable, place to sew. See easy, lime green... Obviously. I have known pretty much since the beginning that the main colour in the studio had to be lime green. So why am I second guessing that decision? I mean I second guess other decisions all the time (marriage, kids, Saskatchewan), but this one I was sure of. Anyhow as I stare at the computer my mind is changing it's self again so here is the photo of the colours I have picked out.
I have every single paint chip off the rack... seriously like 400 of them and I went through each one, one by one. I totally hate all these colours now... Maybe I should just go paint it orange tomorrow.
Here's Jeremy making fun of my DIY stirstick. I like to stir in comfort, that means with a handful of stick, not 3 measly inches.
Well with paint being a hypothetical done deal in a couple days it's time to turn the think tanks on to flooring. Jeremy informed me that my one and only option is laminate, since he built everything with the mantra "laminate can fix that" in mind. I'm fine with this (although I pretended not to be at first just to see how our marriage was doing, we're still good). Anyhow with this decision made I was sent to take some actual measurements. We had already crunched the guesstimate numbers but we needed something more concrete to go on. Turns out or cleverly named Renovation 600: The Studio was perhaps an exaggeration... by about 200 square feet. Yea, 412 square feet... hmmmm, it seamed so much bigger, but than again I'm short. So I could either mourn the loss of 200 square feet or rejoice in my much reduced flooring estimate, I'm still on the fence on this one.
Here is most recent video of the Studio. I apologize for my carrying on over the corners, but there ARE a lot of corners.
So with Spring in full force and Summer around the corner (fingers crossed eh!), Jeremy and I have been talking about nothing but our impending move... That's right we are moving into this studio. We plan to begin massive renovations at the house in July. I'm so far ahead of myself I'm in the wrong darn race. The projects for the studio go as thus:
Finish paint
Fix hatch to creepy crawl space
Install rough pluming and hook up hot water tank ("before there are too many spiders" -Jeremy)
Flooring (laminate, same throughout)
Paint and clean windows doors
Trim
Fix all the "I'll get that later" stuff.
Deadline: July. OK. Please send all alcoholic donations to:
Crazy Lady and Husband
1234 Middle of Nowhere, Saskatchewan
Canada.
My moment has come. It's my turn to take over the forward momentum of the Studio. Mudding and taping the drywall is the first thing on my list. I would like to bring an important fact to light, I have very little experience when it comes to mudding and taping. But with practice comes competence There are different types of tape, tools, and techniques used by both professionals and 'Do-It-Yourselfers". After a quite a few hours of frustration and YouTube interruptions I can confidently say I don't entirely suck at mudding and taping.
On that note by the time I'm finished with this building I may consider a career change... no I won't, whoever does this for a living is insane.
In quilting we call this a 'Y' seam. In drywall we call it another &$#@ing corner. But I have persevered so far, and I find the swearing has dropped from constant irrational streaming to a calm repetitive s-word every 3 feet.
As I may have mentioned before this is my favorite part of the studio, it is the front door area... what I have yet to mention was the difficulty I had in achieving such a nice seamless taping job here. I would love to go into long fault finding explanations about my husbands poor job of hanging drywall but in all reality it isn't entirely his fault (plus did you see the bubbles in that photo above, I really can't complain too much). I swear the building is twisted, not crooked but twisted (must have been why we liked it at first).
Figure 1.0
This was only the beginning of the taping torture. May I present Figure 1.0, or otherwise known as 'No, I want to keep the post, it's pretty' or 'Why did we keep this stupid... beep, beep, post!'. I know it should come to no ones surprise that we failed to spring for the metal corner pieces that make these outside corners a breeze... although I think I may know some people who make cleaner drywall cuts, not pointing fingers (ahem... Jeremy). Anyhow as messy and uncertain as this appears I have already added the first (extremely thick) coat of mud over this and it looks fine.
Finally I would like to show you where I am now (skill wise) with my mudding.
It may be almost impossible to see or understand but that is one flat looking seam. Anyhow I have an endless number of pressing things to attend to (and a cup of tea to drink) so that is all for the update. I was planning to go into what tape I prefer and why and technique details but I seriously doubt anyone reading this post would ever take my advice.
The lights are on. I don't really know if I'm able to project my happiness across the internet to you, but THE LIGHTS ARE ON!!! A minor paperwork foul up left us waiting for the power for a little longer than expected, but once everything was sorted out SaskPower was at the Studio within a couple hours and 10 minutes after they got here we were in business. It's so much easier to work in the Studio without tripping on extension cords and dealing with work lights in the vast dark Canadian prairies.
Lights are defiantly an improvement of the working conditions but honestly its about to get better as soon as we get the heat on. A couple of things need to be finished before we can turn that thermostat on... like installing the thermostat. But also finishing up the insulation above the bathroom and bedroom ceilings, and installing the exhaust fan for the bathroom at the same time. Putting in a proper door, and building an insulated access door to the attic. There is no point on heating a poorly insulated building. So in a moment of insanity (and also because I knew Jeremy really didn't want to do it) I volunteered to finish insulating the attic and to install the exhaust fan. I give Jeremy a lot of credit for his dismissive shrug, and not showing the panic that must have been going through his mind. An hour or so later I was done, sorry no photos... I was too busy.
Nothing but bills from here on out.
Anyhow while I was busy inhaling fiberglass Jeremy was installing the next exterior door in the back porch. Step one was to measure the door... Step two was to build a new frame on the interior wall to mount the door, and step three was to cut a GIGANTIC hole... Does that hole look too big? That's because it is too big. Luckily this isn't an exact science and nothing a level a whole ton of shims and some spray foam can't fix. Jeremy has also been puttering around finishing off projects here and there getting ready to turn on the heat and set me loose in the Studio with a huge bucket of mud and some tape. I'm optimistic about mudding the Studio alone... but I'm not entirely certain how it's going to pan out with the 15 foot ceilings, and some fairly obnoxious gaps... But I'm up for the challenge plus it'll be warm in there.
Light. How I miss having light. Jeremy works almost every evening on the Studio using an extension cord and some work lights. It really doesn't help having such a long dark winter. But there is light, at least at the end of the proverbial tunnel. As all of the electrical is finished and literally waiting for SaskPower to come and tie us into the grid (literally a 5 minute job).
In the meantime it's time to get serious about drywall and finish all the little bits and pieces that didn't seem important at the time but now are glaringly obvious. Drywall doesn't do itself and sometimes it pays to bring in some relatives... Like the in-laws. So with Papa working with Jeremy on finishing up the drywall we started, and Grandma entertaining the kids outside, I got to do some sewing... To my never ending shame I'm sure. I'll cut this short and show some before and after photos.
Bathroom - Before
Bathroom - After
Main Room West Wall - Before
Main Room West Wall - Half Way...
Main Room West and North Wall - After
Everything is really starting to come together in there. Some times when you drywall a space it seems smaller than before, this space feels exactly opposite. It's much bigger feeling, mostly because it isn't as full of building materials, and the ladders are put away. As soon as we get some heat in there it will me my time to shine and the mud and tape derby will begin!
Man of the Day
Drywall Apprentices
On to doors. This is the back door to the studio, it's approximately 27 inches wide, considering that standard exterior doors are between 32 to 36 inches wide, it's a little door. This is of course ignoring entirely the fact that it is a couple of planks nailed together with some cross braces (aka: a barn door).
So as we 'finish' the major framing/construction of the Studio there is still more to do.... The new door is stashed away in the shop for now awaiting some form of ambition which after a marathon weekend I don't blame Jeremy for motivational apathy.
There is also a door between the back porch and the North wall (pictured above) that sports this awesome door knob. Now I'm not really much for sentimentality but this knob is so cool! Plus it comes with a groovy key. Does anyone know why the key has been blunted? Should I take it somewhere and get a new ring attached or just leave it as is? Anyhow one way or another this door/knob/key are staying in the Studio.
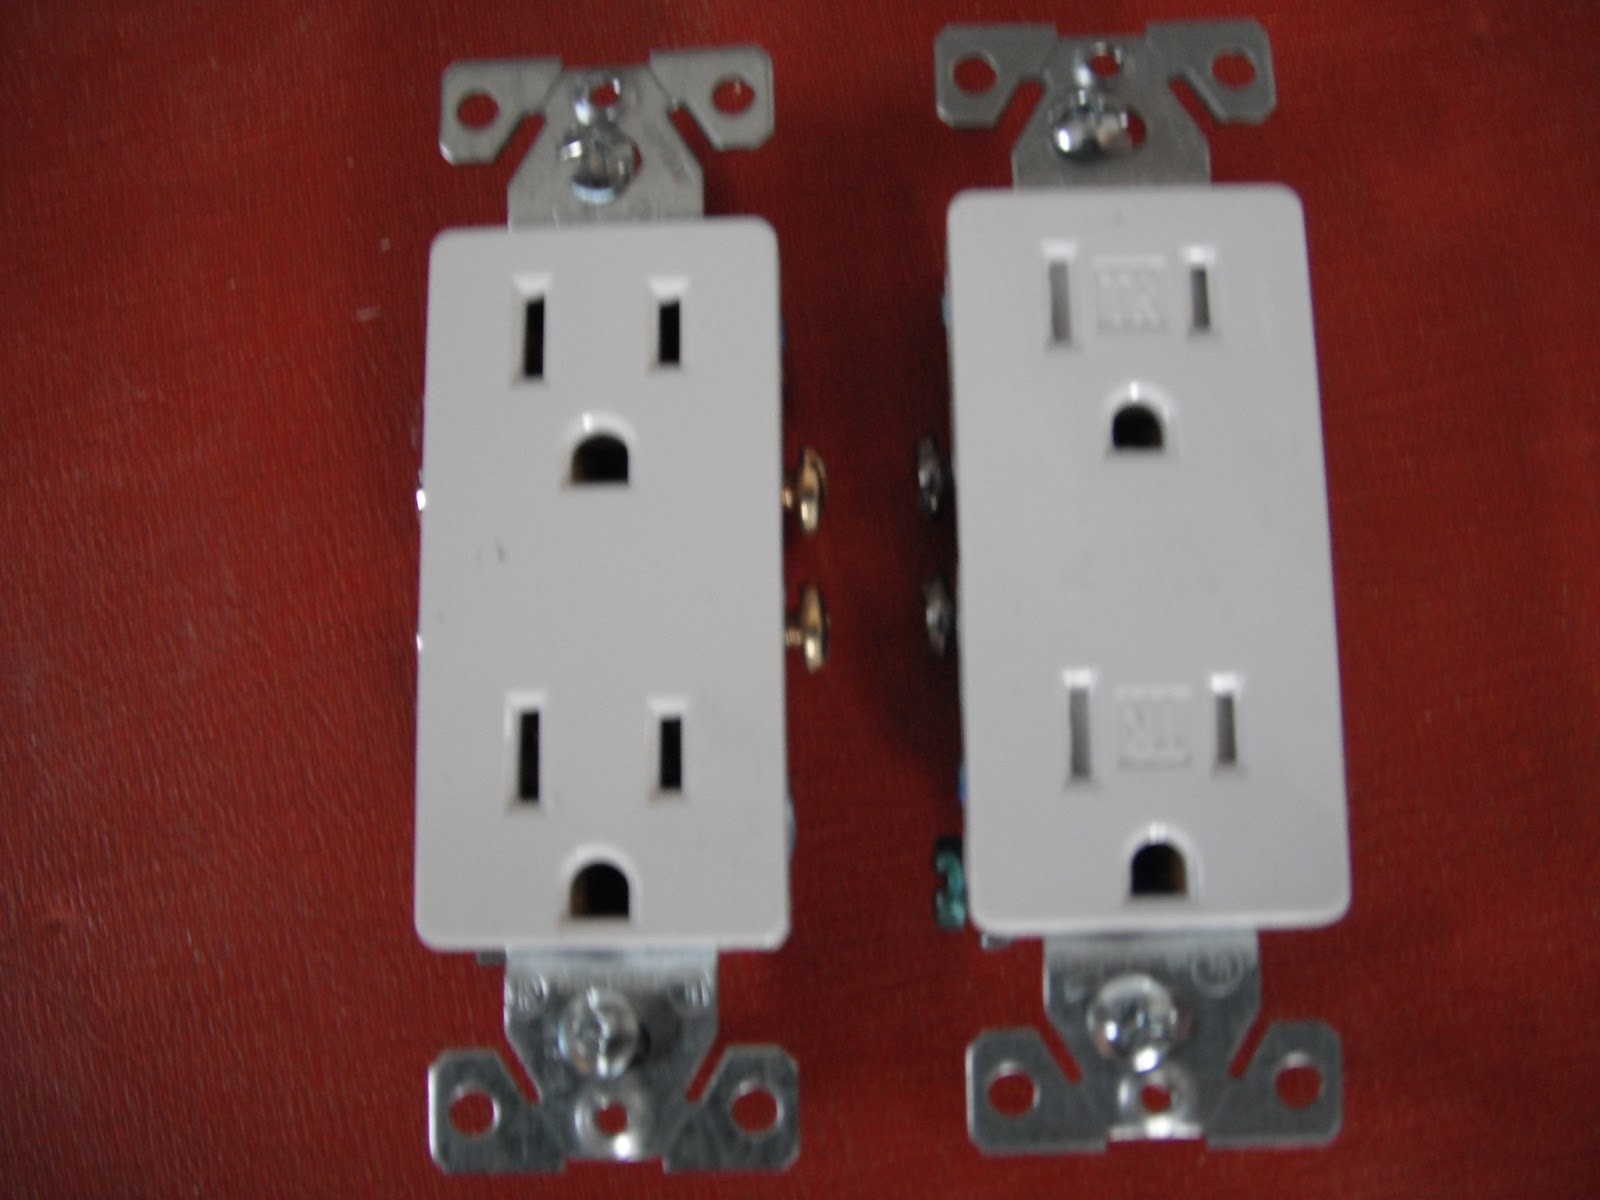
Jeremy finished up the interior wiring bowing down to my insistence that I NEEDED my sewing machines and iron on separate circuits so you don't get that whole dimming of the lights every time the iron kicks on. Anyhow he ran everything and got all the outlets installed with a little help from myself (I held the wire rolls, and drilled some holes ;). When we realized that the electrical code had been re-written (75 pages) in Saskatchewan. It is now required to have tamper proof outlets in both new construction and renovations.
Old Style Tamper Poof
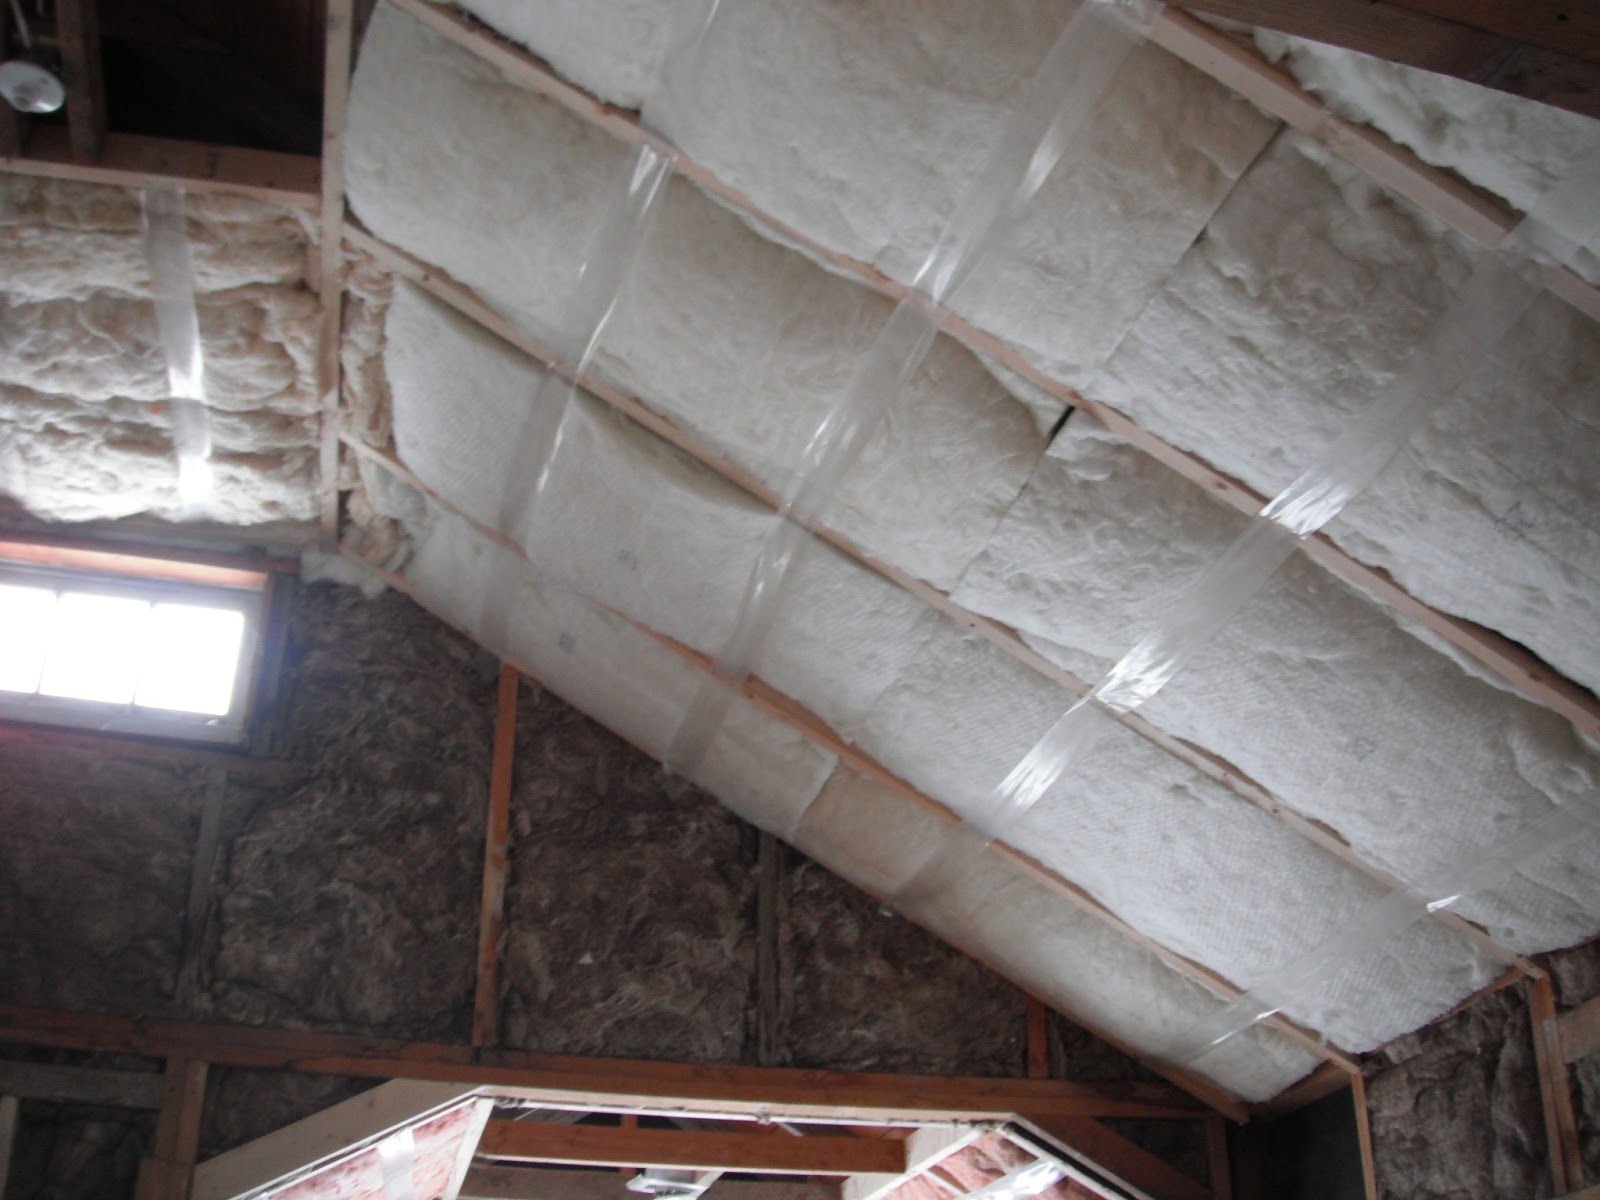
Personally I'm a little miffed that we had to buy all new outlets. Especially since I really don't see a need for them. But the best part was my husbands swearing, to say he was a little miffed is the biggest understatement of our year. It was truly creative and inspiring the way he combined words to create concepts that I've never heard of (which is impressive since I worked in a sawmill once). Anyhow the juices must have been flowing because next came insulating around the wiring while we waited for the inspector. So Jeremy cut strips of poly and suspended the insulation on the vaulted ceiling this way.
Now we can just put up the poly when the inspection is over and avoid unnecessary seams.
It can be endlessly frustrating working on old houses. One of those things is the jigsaw puzzle that is insulating the walls. Jeremy and I can usually work well together, but I'm not gonna lie, this ended up being a particularly difficult job for the husband wife duo. Nothing a poorly thrown hammer can't fix... That and stalking off in a towering rage because SOMEONE (me) didn't put the 'pretty' side out when I put the insulation in the wall... I thought it was the pretty side... Nothing a 10 AM beer won't fix.
More insulation photos :)
Despite the insulation being patch worked into the walls it's really not making a ton of difference with the temperature inside the building. When it's -30 odd degrees outside there just isn't a fix for that, although Jeremy swears by a dollop of Carolans in the coffee.
It's really starting to look like a building now.
The inspector arrived and passed Jeremy's wiring with flying colours (I knew I picked him for a reason). Obviously this is after changing out the old style outlets. So now we can close up the walls and maybe get some heat in there! Unfortunately we have been waiting on an electrician to hook up the panel and tie us into the grid... for 3 weeks... until I made a very serendipitous connection with a woman who happens to have an electrician husband who does residential wiring. He (Shawn) came over three days later and got a start on the Studio. So in a flurry of activity Jeremy and our friend Kirby went to town on installing the vapor barrier. Jeremy came home with a load the other day that brought tears to my eyes... Drywall. Work continues and is coming along more everyday, Jeremy and Kirby have been working like crazy, and the count down is on til our first guests arrive in February.


 Well I believe I will open this blog post as most Canadian blog posts have been opened for the past month... Can you believe this Spring? I haven't updated the blog in a month mostly due to some spring blues.
  Today Jeremy and I started the priming. He's all back on board... I could go into a wifely tale of abandonment and how a woman is the center of the universe, but Jeremy did work on the studio with no insulation or heat all winter... So I'll hold my tongue. We had to rent some scaffold to reach the vaulted ceiling in the main room. While we had the scaffold we (I) decided to get all the tapping/mudding/sanding/repeat/primer/paint and finally the fan hung. Jeremy put the fan up. Priming was fun (sarcasm). Jeremy and I had an on going conversation.


 There is also a door between the back porch and the North wall (pictured above) that sports this awesome door knob. Now I'm not really much for sentimentality but this knob is so cool! Plus it comes with a groovy key. Does anyone know why the key has been blunted? Should I take it somewhere and get a new ring attached or just leave it as is? Anyhow one way or another this door/knob/key are staying in the Studio.
 Personally I'm a little miffed that we had to buy all new outlets. Especially since I really don't see a need for them. But the best part was my husbands swearing, to say he was a little miffed is the biggest understatement of our year. It was truly creative and inspiring the way he combined words to create concepts that I've never heard of (which is impressive since I worked in a sawmill once). Anyhow the juices must have been flowing because next came insulating around the wiring while we waited for the inspector. So Jeremy cut strips of poly and suspended the insulation on the vaulted ceiling this way.